10 Stunning Thanksgiving Nail Designs to Celebrate the Season

Your hands are on display all through Thanksgiving. You pass dishes, carve the turkey, hold a wine glass, and point at the camera for the family photo. The right Thanksgiving nail designs make all of those moments look polished. They capture the warm colors of the season and survive a full day of cooking and cleanup.
The challenge is picking a design that fits your skill level and your schedule. A hand-painted turkey looks charming, but it takes a steady hand and an hour of free time. A deep berry manicure takes 20 minutes but needs the right shade for your skin tone. Gel polish lasts through the holiday weekend, while regular polish may chip before the pie comes out.
This guide covers 10 Thanksgiving nail designs, from simple one-color looks to detailed nail art. Each design lists the key details, skill level, tools you need, and one pro tip. You will also find:
- A fall color palette guide matched to skin undertones
- Tables comparing polish finishes, nail shapes, and all 10 designs
- At-home and salon advice, plus care steps that keep your manicure intact through the holiday
What Makes Great Thanksgiving Nail Designs
Great Thanksgiving nail designs balance three things: seasonal color, practical durability, and a level of detail you can actually achieve. Miss one, and the manicure works against you by Thursday afternoon.
Seasonal Color Sets the Mood
Seasonal color is the fastest way to signal the holiday. Burnt orange, rust, mustard, olive, cranberry, and warm brown all mirror what appears on a Thanksgiving table: squash, cranberry sauce, roasted turkey, and fall foliage.
You do not need literal turkeys or pumpkins. A single shade of cinnamon brown reads as autumn on its own. Add one accent nail with gold foil or a leaf, and the look becomes festive.
Durability Matters More Than Usual
Thanksgiving is hard on nails. Peeling potatoes, kneading pie dough, and scrubbing roasting pans all expose your manicure to friction, heat, and hot water.
Hot water softens nail polish and the nail plate (the hard surface of the nail). That softening is why chips often appear after a long session at the sink. Choose a long-wear formula, or plan to wear gloves during cleanup.
Detail Should Match Your Skill
A simple design done well looks better than a complex design done badly. Shaky lines and smudged dots draw more attention than a clean, solid color.
Choose your design based on the time you have and the tools you own. The skill levels in this guide range from beginner to advanced, so you can pick honestly.
Count the days until Thanksgiving, which falls on Thursday, November 26, 2026, and decide whether you will paint at home or book a salon.
How to Choose the Right Fall Color Palette
The right fall palette depends on your skin’s undertone. Undertone is the subtle warm, cool, or neutral hue beneath your skin’s surface, and it stays the same whether you tan or not.
Your undertone decides which autumn shades brighten your hands and which make them look dull. Orange based colors flatter warm skin. Blue-based reds and plums flatter cool skin.
Find Your Undertone in Three Steps
- Check your wrist veins in natural light. Blue or purple veins suggest a cool undertone. Green veins suggest a warm undertone.
- Compare gold and silver jewelry. If gold looks better against your skin, you likely have a warm undertone. If silver looks better, you likely have a cool one.
- Note a mix of both. If veins look blue-green and both metals work, you have a neutral undertone and can wear most fall shades.
Fall Shades by Undertone
| Fall Shade | Best Undertone | Mood | Pairs Well With |
| Burnt orange | Warm | Energetic, festive | Gold, cream, brown |
| Rust / terracotta | Warm, neutral | Earthy, cozy | Olive, gold, nude |
| Mustard yellow | Warm | Bright, playful | Brown, burgundy |
| Olive green | Warm, neutral | Natural, muted | Rust, cream, gold |
| Cranberry | Cool, neutral | Rich, classic | Gold, nude |
| Plum / aubergine | Cool | Moody, elegant | Silver, mauve |
| Chocolate brown | All | Warm, grounded | Cream, gold, orange |
| Cream / oatmeal | All | Soft, minimal | Brown, gold, rust |
Chocolate brown and cream work across all undertones. They make a safe starting point for Thanksgiving nail designs if you are unsure where you fall.
Use the 60-30-10 Rule for Multi Color Designs
The 60-30-10 rule is a color formula borrowed from interior design: 60% main color, 30% secondary color, and 10% accent. Applied to nails, it keeps multi-color looks balanced.
Paint six to seven nails in your main shade, two to three in a secondary shade, and add one accent through glitter, foil, or art. A rust base, cream secondary, and gold accent follows the formula exactly.
Swatch your three top shade picks on a nail tip or a clear practice wheel in daylight before you commit to a full manicure.
Polish Finish Types Explained
Finish is the surface texture of polish after it dries. The same shade can look cozy in matte, glamorous in metallic, and classic in cream, so finish changes the mood of your design as much as color does.
| Finish | Look | Best Designs | Chip Resistance |
| Cream (crème) | Opaque, glossy, no shimmer | Berry, harvest tones, plaid base | High |
| Shimmer | Fine reflective particles | Pumpkin spice, ombre | High |
| Metallic | Foil-like, mirror sheen | Accent nails, leaf details | Medium |
| Glitter | Chunky or fine sparkle | Glitter ombre, accents | High (hard to remove) |
| Matte | Flat, velvety, no shine | Harvest tones, plaid, leaves | Low to medium |
| Jelly | Sheer, tinted, glass-like | Tortoiseshell | Medium |
| Chrome | Liquid-metal powder finish | Accent nails, French tips | Medium |
| Magnetic (cat eye) | Shifting band of light | Berry, plum | High (as gel) |
Matte vs. Glossy
Matte finishes look modern and mimic suede, wool, and flannel. That texture suits fall perfectly. The tradeoff is durability: matte top coats show wear faster, and oils from cooking can leave shiny spots.
Glossy finishes resist stains better and are easier to touch up. If you plan to cook most of the meal, a glossy top coat is the more practical choice.
Mixing Finishes
Finish mixing means pairing two textures in one manicure. A matte rust base with glossy cream leaves creates depth without adding new colors. It is one of the easiest ways to make simple Thanksgiving nail designs look salon-made.
Buy one matte top coat and one glossy top coat so you can switch finishes on any shade you already own.
10 Thanksgiving Nail Designs for Every Skill Level
Each of these Thanksgiving nail designs includes the key details, a skill level, the tools you need, and one pro tip. Start with designs that match your skill level, then build toward more detailed art next season.
1. Autumn Leaves
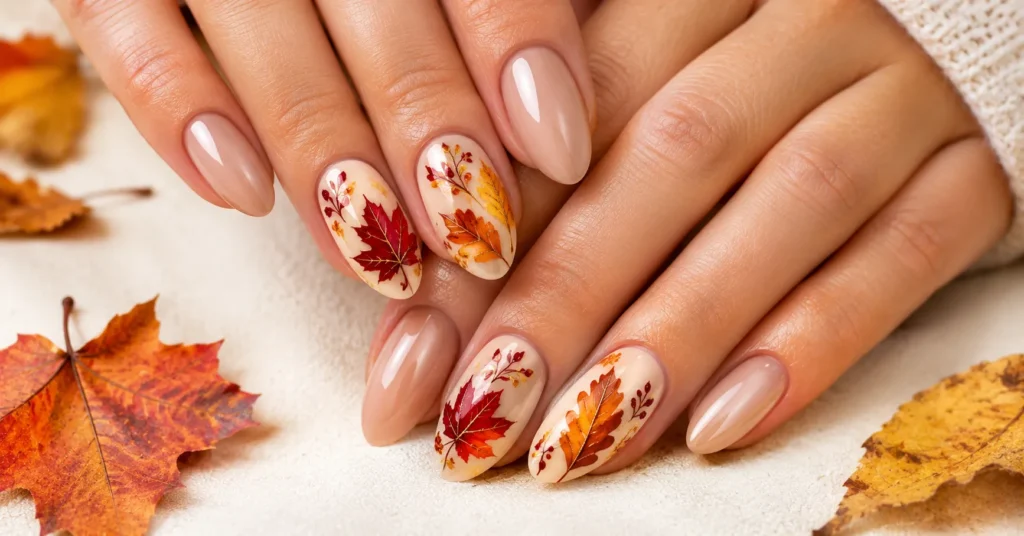
Autumn leaf nails are the most recognizable fall nail art. They feature small maple, oak, or birch leaves painted or applied over a neutral or warm base.
Key details: Choose a nude, cream, or soft taupe base so the leaves stand out. Paint leaves in rust, mustard, burnt orange, and deep red. Place one large leaf on an accent nail, or scatter small leaves across every nail.
Water-slide decals (thin printed designs that transfer to the nail when soaked in water) make this design achievable for beginners. Hand painted leaves need a fine detail brush and a steady hand.
Skill level: Beginner (with decals) to intermediate (hand painted)
Tools needed: Base color, two to three leaf shades, a detail brush or leaf decals, tweezers, top coat
Pro tip: Paint leaves in two quick strokes that meet at a point, then add a thin line down the center for the vein. Two strokes look more natural than an outlined and filled shape.
2. Turkey Accent Art
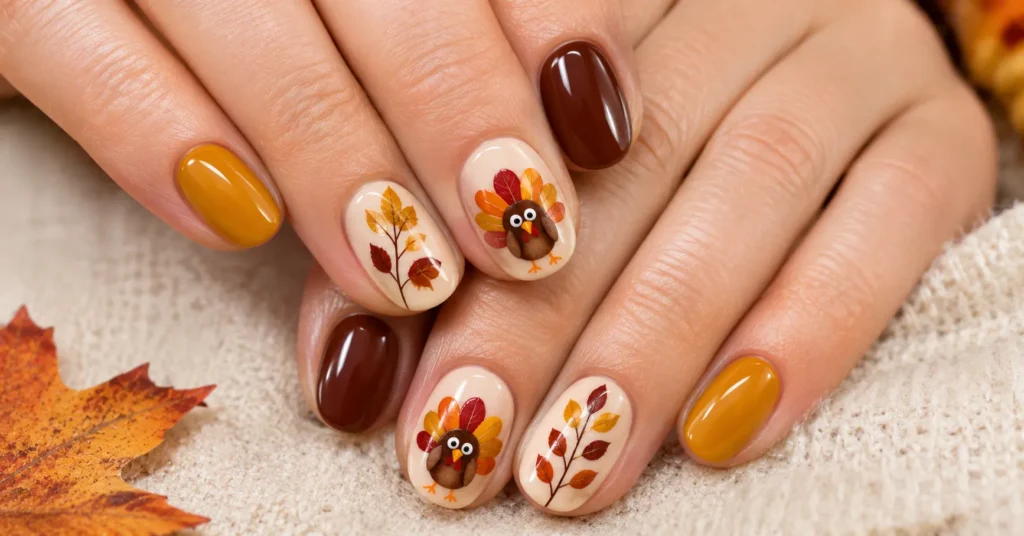
Turkey nail art turns one accent nail into a playful holiday character. It is a favorite for family gatherings, especially with kids at the table.
Key details: Paint a brown circle near the cuticle for the turkey’s body. Fan out tail feathers in orange, red, yellow, and brown above it. Add small white dots for eyes, a black dot for each pupil, an orange triangle for the beak, and a tiny red wattle.
Keep the other nails simple. Solid mustard, brown, or cream lets the turkey carry the theme.
Skill level: Intermediate
Tools needed: Dotting tool, striping brush, four feather colors, white and black polish, top coat
Pro tip: Paint the feathers first and the body second. Layering the body over the feather base hides uneven edges and gives the turkey a cleaner outline.
3. Flannel Plaid
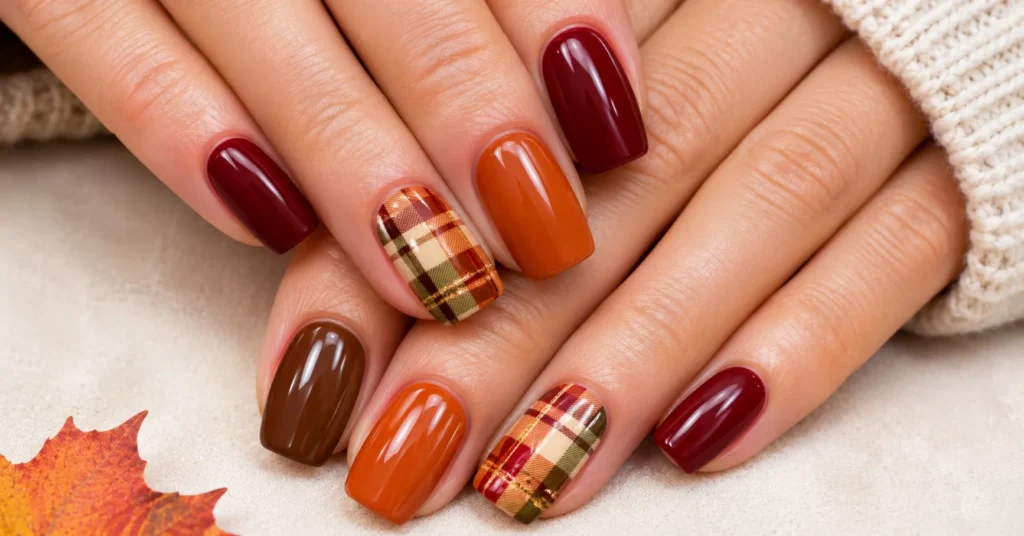
Plaid nails echo the flannel shirts and wool blankets of late fall. Plaid is a pattern of crisscrossing horizontal and vertical bands in two or more colors.
Key details: Start with a base in rust, mustard, olive, or burgundy. Paint wide stripes in a second color in both directions. Add thin crossing lines in a third color, usually black, cream, or gold.
Plaid works as a full set or as two accent nails beside solid shades pulled from the pattern. Matte top coat makes the pattern look like fabric.
Skill level: Intermediate
Tools needed: Striping brush or striping tape, three polish colors, matte top coat
Pro tip: Use striping tape for perfectly straight lines. Apply it over a fully dry base, paint over it, and peel it off while the top color is still wet so the edges stay crisp.
4. Harvest Tones Skittle Manicure
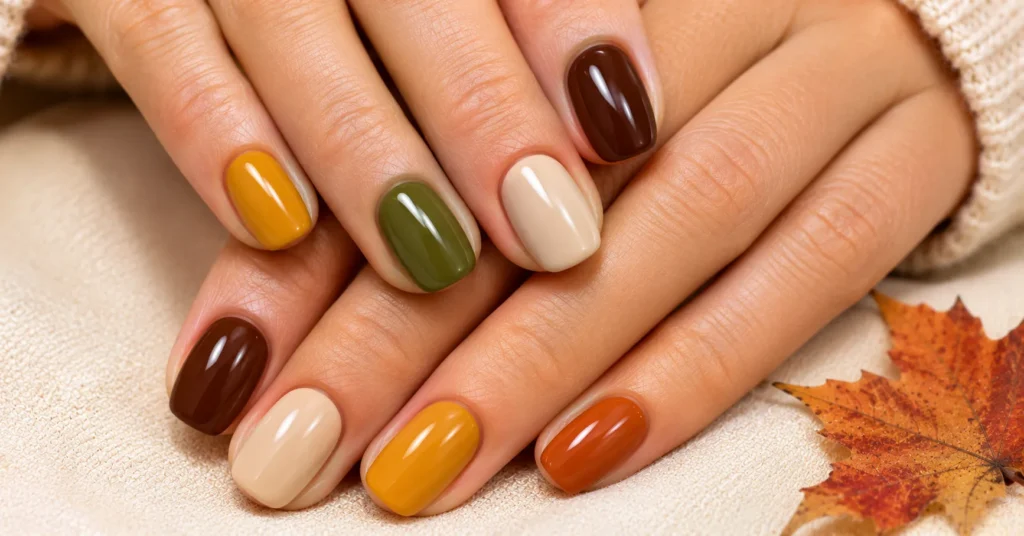
A skittle manicure is a set where each nail wears a different color from the same family. Harvest tones turn it into one of the easiest Thanksgiving nail designs for beginners.
Key details: Choose five shades that represent the harvest table: mustard, olive, terracotta, chocolate brown, and cream. Paint one shade per finger, then repeat the order on the other hand.
The design looks curated because the colors share warm undertones. No art skills are required, only clean application.
Skill level: Beginner
Tools needed: Five coordinating polishes, base coat, top coat
Pro tip: Arrange shades from lightest to darkest, thumb to pinky. A gradient order looks intentional and photographs well when your hands are side by side.
5. Gold Glitter Ombre

Ombre is a gradual blend from one color to another. A glitter ombre fades sparkle from the tip toward the cuticle, so the nail looks dipped in gold.
Key details: Paint a base of nude, cranberry, or chocolate brown. Dab gold glitter polish heavily at the tips, then lighter as you move toward the middle of the nail. Seal with two coats of glossy top coat to smooth the texture.
This design suits Thanksgiving dinners at restaurants or dressier family gatherings. It also carries well into the December holidays.
Skill level: Beginner to intermediate
Tools needed: Base color, gold glitter polish, makeup sponge, liquid latex or tape for cuticle protection, top coat
Pro tip: Dab the glitter polish onto a cut piece of makeup sponge, then press it onto the nail tip. A sponge places glitter more evenly than a brush and builds a smoother fade.
6. “Grateful” Script Lettering
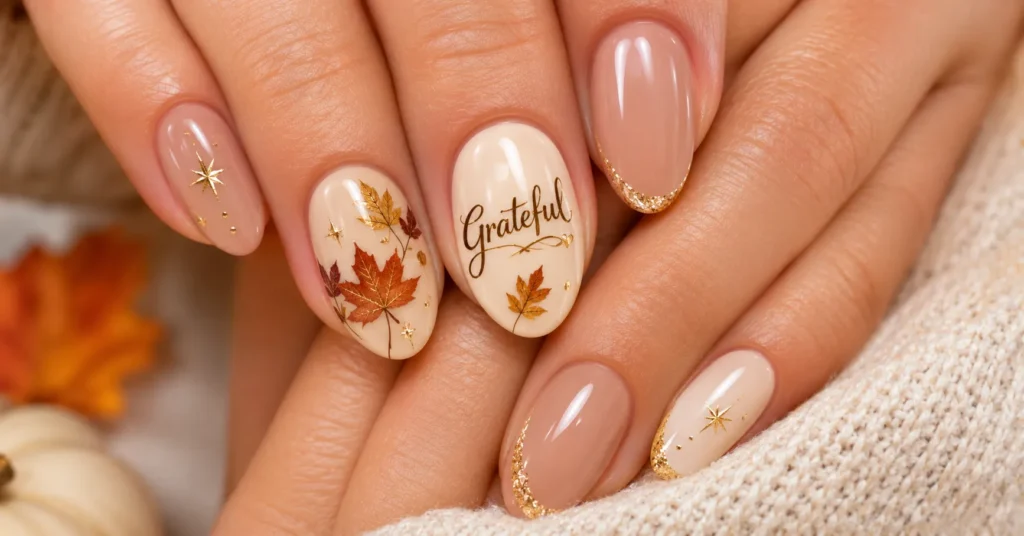
Lettering nails spell a short word across an accent nail or across all ten nails. “Grateful,” “Thankful,” and “Blessed” are the most common choices for the holiday.
Key details: Use a cream or nude base with lettering in gold, brown, or black. Fit one short word on the ring finger accent nail. For a bolder look, spell “THANKFUL” with one letter per nail across eight fingers.
Script lettering requires precision. Nail art pens (polish in a fine-tipped marker format) give you more control than a brush.
Skill level: Advanced (freehand) or beginner (with stickers)
Tools needed: Nail art pen or fine liner brush, base color, letter stickers as a backup, top coat
Pro tip: Let the lettering dry for at least five minutes before you apply top coat. Then float the top coat over without pressing the brush down, so the ink does not smear.
7. Pumpkin Spice Tones
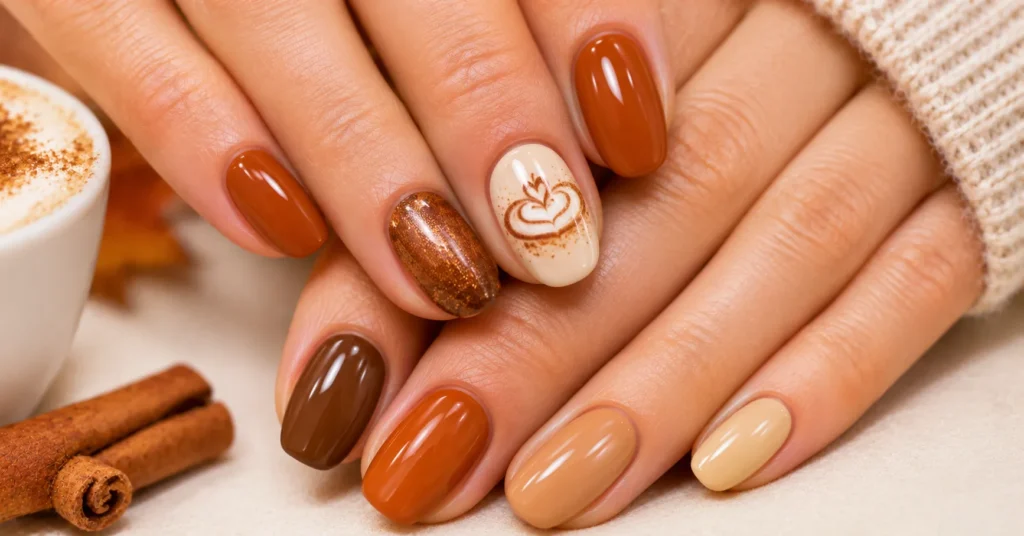
Pumpkin spice nails use the warm, cozy colors of the season’s most famous flavor. Starbucks launched its Pumpkin Spice Latte in 2003, and the name now describes an entire fall aesthetic.
Key details: Build a palette of burnt orange, cinnamon, nutmeg brown, and creamy latte. Wear one shade on all nails, or combine them as a gradient across each hand.
Shimmer finishes add a warm glow that mimics a spice dusting. A single cream accent nail with a tiny brown swirl looks like latte foam.
Skill level: Beginner
Tools needed: Two to four spice toned polishes, optional shimmer top coat, top coat
Pro tip: Choose a burnt orange with a brown base rather than a red base. Brown based oranges look softer and more seasonal, while red based oranges lean toward summer.
8. Tortoiseshell

Tortoiseshell nails imitate the mottled amber and brown pattern of the hawksbill turtle’s shell, the same pattern found on classic eyeglass frames. The look is glossy, warm, and sophisticated.
Key details: The design depends on jelly polish, a sheer, tinted polish that lets layers show through. Start with a coat of amber or honey jelly. Dab irregular spots of brown, then smaller spots of near-black, and cover each layer with more amber jelly.
The depth comes from layering. Three to four rounds create the realistic, glass-like effect.
Skill level: Intermediate
Tools needed: Amber jelly polish, brown and black polish, dotting tool or small brush, glossy top coat
Pro tip: Keep the spots uneven in size and spacing. Real tortoiseshell is irregular, and perfectly round, evenly spaced dots look like leopard print instead.
9. Negative Space Leaves
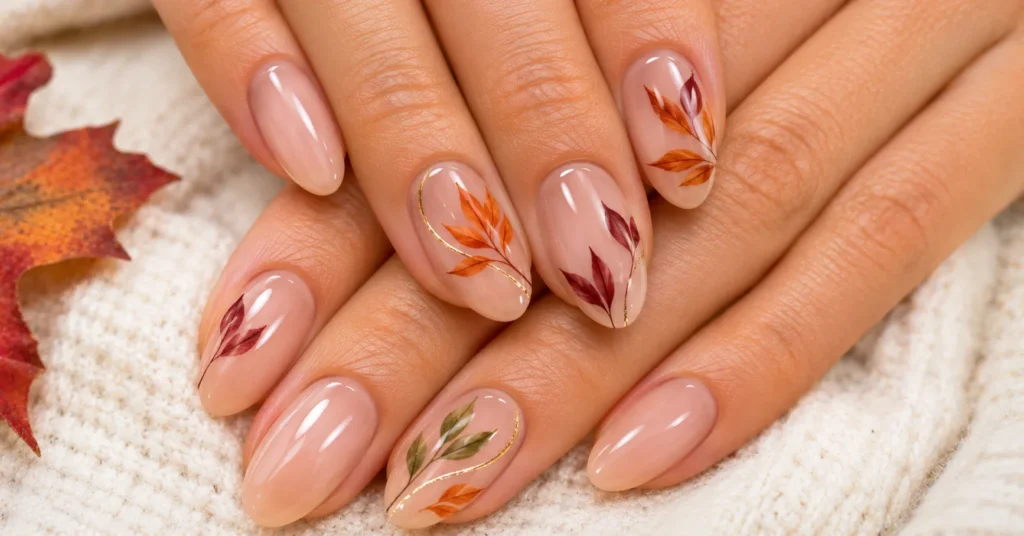
Negative space nail art leaves part of the natural nail bare as a design element. It looks minimal and modern, and it makes regrowth less noticeable.
Key details: Apply a clear base coat to the whole nail. Place a leaf-shaped nail vinyl (an adhesive stencil) on the nail, paint over it with rust, olive, or burgundy, and peel the vinyl away. The bare leaf shape remains in the middle of the color.
You can also reverse the method. Paint only a small leaf, crescent, or stripe on a bare nail and leave the rest clear.
Skill level: Beginner to intermediate
Tools needed: Clear base coat, leaf nail vinyls, one or two colors, tweezers, top coat
Pro tip: Press the vinyl edges down firmly with a cuticle pusher before painting. Lifted edges let polish seep underneath and blur the shape.
10. Cranberry Berry Manicure
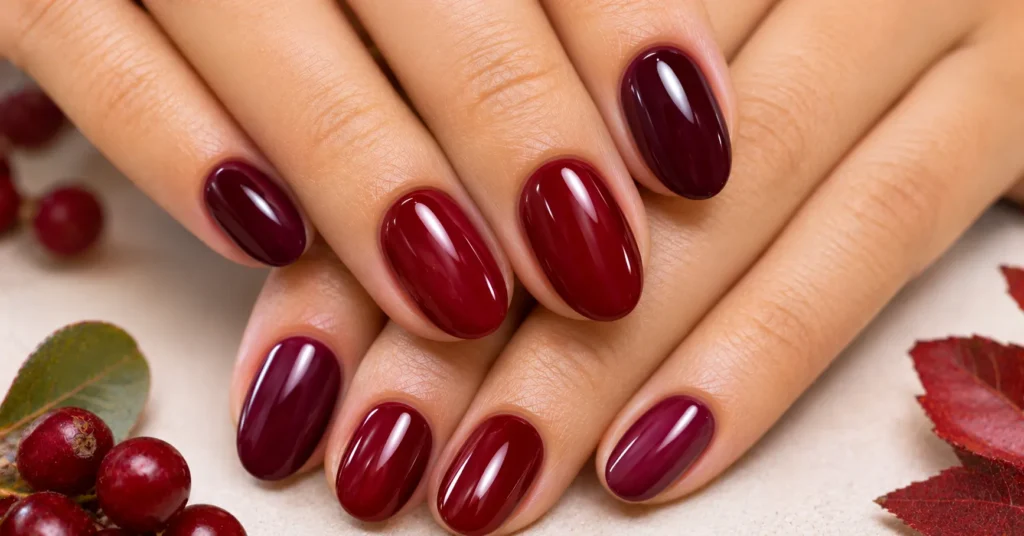
A berry manicure is a single color look in deep red purple shades like cranberry, merlot, or blackberry. It is the most elegant of these Thanksgiving nail designs and the fastest to apply.
Key details: Choose a shade that matches your undertone. OPI’s Malaga Wine, a deep berry red, suits warm and neutral skin. Plum leaning berries suit cool skin. Apply two thin coats for full opacity.
The berry manicure transitions directly into Christmas and New Year’s Eve. One appointment covers the whole season.
Skill level: Beginner
Tools needed: Base coat, berry polish, glossy top coat, cleanup brush dipped in acetone
Pro tip: Always use a base coat with dark berry shades. Deep red pigments stain the nail plate yellow orange without a protective layer underneath.
Choose two designs from this list: one main look and one simpler backup if time runs short.
Compare All 10 Thanksgiving Nail Designs at a Glance
This table puts every design side by side. Use it to match Thanksgiving nail designs to your skill level and available time.
| # | Design | Skill Level | Time (At Home) | Best Finish | Best Occasion |
| 1 | Autumn Leaves | Beginner–Intermediate | 45–60 min | Matte or glossy | Family dinner |
| 2 | Turkey Accent Art | Intermediate | 60 min | Glossy | Kid-friendly gatherings |
| 3 | Flannel Plaid | Intermediate | 60–75 min | Matte | Casual Friendsgiving |
| 4 | Harvest Skittle | Beginner | 30 min | Cream | Any gathering |
| 5 | Gold Glitter Ombre | Beginner–Intermediate | 40 min | Glitter + gloss | Dressy dinners |
| 6 | “Grateful” Lettering | Advanced | 60 min | Glossy | Photos, hosting |
| 7 | Pumpkin Spice Tones | Beginner | 30 min | Shimmer | Brunch, casual dinners |
| 8 | Tortoiseshell | Intermediate | 50 min | Glossy | Restaurant dinners |
| 9 | Negative Space Leaves | Beginner–Intermediate | 40 min | Glossy | Work and holiday |
| 10 | Cranberry Berry | Beginner | 20–25 min | Glossy | Any, through New Year’s |
Beginners get the best results from the harvest skittle, pumpkin spice, and berry looks. Each one needs only clean application, not art skills.
Circle the row that fits the time you have the evening before Thanksgiving, and gather the listed tools now.
Nail Shapes That Suit Each Design
Nail shape changes how a design reads. The same plaid pattern looks bold on square nails and soft on oval ones, so pick your shape before your design.
| Shape | Description | Best Thanksgiving Designs | Practicality for Cooking |
| Round | Curved tip that follows the fingertip | Berry, skittle, pumpkin spice | Very high |
| Oval | Longer, egg shaped curve | Autumn leaves, negative space | High |
| Squoval | Square with softened corners | Plaid, harvest tones, berry | High |
| Square | Flat tip, sharp corners | Plaid, lettering | Medium |
| Almond | Tapered sides, rounded peak | Tortoiseshell, glitter ombre | Medium |
| Coffin (ballerina) | Tapered with a flat tip | Glitter ombre, turkey art | Low |
| Stiletto | Long, sharp point | Glitter ombre, chrome accents | Very low |
Match Shape to Design Area
Detailed art needs room. Lettering and turkey art work best on wider, flatter surfaces like square and squoval nails, which give you more canvas.
Patterned designs like tortoiseshell look more elegant on almond and oval shapes. The tapered silhouette makes fingers look longer.
Match Shape to Your Holiday Role
If you are hosting and cooking, choose short round or squoval nails. Long coffin and stiletto shapes catch on oven mitts, plastic wrap, and dough. Guests who are not cooking have more freedom to wear length.
File your nails into shape at least one day before you paint, using a glass or fine-grit file moving in one direction.
At-Home vs. Salon Thanksgiving Manicures
At-home manicures save money and give you full control. Salon manicures save time and deliver longer wear. The best choice for your Thanksgiving nail designs depends on your budget, schedule, and skill level.
| Factor | At Home (Regular Polish) | At Home (Gel Kit) | Salon Gel | Dip Powder |
| Typical wear | 5–7 days | 2–3 weeks | 2–3 weeks | 3–4 weeks |
| Upfront cost | Low | Moderate (lamp + polish) | Moderate per visit | Moderate per visit |
| Time to apply | 30–75 min | 45–90 min | 45–75 min | 45–75 min |
| Dry time | Several hours to fully harden | Instant after curing | Instant after curing | Instant after sealing |
| Removal | Acetone or non-acetone remover | Acetone soak | Acetone soak at salon | Acetone soak |
Tips for At-Home Manicures
At-home success depends on preparation and patience. Follow these steps for cleaner results:
- Push back cuticles. Use a wooden orange stick after a warm shower, when cuticles are soft.
- Wipe each nail with alcohol. Removing oil helps polish grip the nail.
- Apply a base coat. It improves adhesion and prevents staining.
- Paint thin coats. Two or three thin coats dry faster and chip less than one thick coat.
- Clean up the edges. Dip a small flat brush in acetone and trace around the cuticle.
- Seal with top coat. Wrap it over the free edge (the tip of the nail that extends past your finger).
If you own an LED lamp, at-home gel kits from brands like Gelish or Kiara Sky give you salon-length wear. Cure each layer for the time listed on the bottle, usually 30 to 60 seconds under LED.
Tips for Salon Visits
Salons fill quickly in the days before Thanksgiving. Book your appointment one to two weeks ahead, aiming for the Monday or Tuesday before the holiday.
Bring a screenshot of your chosen design. Nail technicians price art per nail, so ask for the total cost before they begin. Accent-nail designs keep the price down while still looking festive.
Check your salon’s booking calendar today and reserve a slot for November 23 or 24 if you want gel or dip powder.
Nail Care and Longevity Tips
A manicure lasts longer when you protect it during the most demanding hours of the holiday. Thanksgiving cooking and cleanup cause most chips, so plan your care around them.
Prepare Nails in the Week Before
- Hydrate cuticles daily. Apply cuticle oil every night for a week. Brands like CND SolarOil and OPI ProSpa make widely available options.
- Stop picking and peeling. Peeling old polish removes layers of the nail plate and weakens the surface.
- Trim and shape early. File one or two days ahead so any rough edges have time to smooth out.
- Skip heavy hand lotion before painting. Lotion leaves an oily film that keeps polish from bonding.
Protect Your Manicure on Thanksgiving Day
- Wear gloves for dishes. Rubber gloves block hot water, which softens polish and causes lifting.
- Use tools, not nails. Open cans, peel labels, and pull foil with a tool or knife edge.
- Reapply top coat the day before. A fresh layer of top coat restores shine and adds a protective seal.
- Carry a mini repair kit. A small bottle of top coat and a nail file fix most small chips in minutes.
Remove Polish Without Damage
The American Academy of Dermatology recommends limiting exposure to harsh chemicals and keeping nails moisturized to prevent brittleness. For gel and dip powder, soak in acetone rather than prying off the product.
Wrap acetone-soaked cotton on each nail with foil, wait 10 to 15 minutes, and gently push the softened product away. Finish with cuticle oil.
Set a nightly phone reminder to apply cuticle oil for the seven days before your manicure.
Common Mistakes With Thanksgiving Nail Designs
Most failed holiday manicures come from a few predictable errors. Each one has a simple fix.
- Paint too early. Regular polish applied a week before Thanksgiving will likely chip by the holiday. Paint regular polish one to two days ahead, or choose gel.
- Skip the base coat. Dark berries, browns, and oranges stain the nail plate. A base coat prevents yellowing.
- Apply thick coats. Thick layers stay soft underneath and dent easily. Thin coats dry harder.
- Rush the dry time. Regular polish feels dry to the touch in about 15 minutes but can take several hours to fully harden. Avoid cooking prep right after painting.
- Overload one hand with art. A turkey, plaid, leaves, and glitter on the same hand look cluttered. Choose one theme and use accent nails.
- Ignore your undertone. The wrong shade of orange or red can make hands look sallow. Test shades in daylight first.
- Choose long shapes while hosting. Coffin and stiletto nails catch on kitchen tools and break under pressure.
Even simple Thanksgiving nail designs look professional when you avoid these errors. Review this list once before you paint.
Conclusion
The best Thanksgiving nail designs match three things: your undertone, your skill level, and your role on the holiday. A berry manicure suits a busy host. Turkey art suits a relaxed family gathering. Tortoiseshell and glitter ombre suit a dressy dinner out.
Use the color palette table to pick shades that flatter your skin. Use the finish and shape tables to choose a texture and silhouette that fit the design. Then follow the care steps so your manicure survives the cooking, the meal, and the cleanup.
These 10 Thanksgiving nail designs give you a formula for every schedule and skill level. Pick your design this week, gather your tools or book a salon slot, and paint one to two days before November 26. Your nails will be ready for every toast, photo, and second slice of pie.
Frequently Asked Questions about Thanksgiving Nail Designs
What are the easiest Thanksgiving nail designs for beginners?
The harvest skittle manicure, pumpkin spice tones, and cranberry berry manicure are the easiest options. Each one needs only clean polish application, with no freehand art. Decals also make autumn leaf designs beginner-friendly.
What colors are best for Thanksgiving nails?
Burnt orange, rust, mustard, olive, cranberry, chocolate brown, and cream are the classic choices. Warm undertones suit orange-based shades. Cool undertones suit plum and blue-based berry tones.
When should I get my nails done for Thanksgiving?
Apply regular polish one to two days before the holiday. Book gel or dip powder up to five days ahead, since they last two to four weeks. Salons fill fast, so reserve your appointment one to two weeks in advance.
How long do Thanksgiving nail designs last?
Regular polish lasts about five to seven days. Gel lasts two to three weeks, and dip powder lasts three to four weeks. Wearing gloves during dishwashing extends the life of any manicure.
Which nail shape is best for Thanksgiving nail designs?
Squoval and oval shapes suit the widest range of designs and hold up well during cooking. Square nails give the most room for lettering and plaid. Almond shapes flatter tortoiseshell and glitter ombre.
Can I wear matte nails for Thanksgiving?
Yes. Matte finishes look especially good with plaid, harvest tones, and autumn leaves. Matte top coat wears faster than glossy, so reapply it the day before the holiday if you painted early.
How do I keep dark nail polish from staining my nails?
Apply a base coat before every dark shade. The base coat creates a barrier between pigment and the nail plate. Remove dark polish with acetone in one firm swipe rather than scrubbing back and forth.
Can Thanksgiving nail designs work for Christmas too?
Several designs transition well. The cranberry berry manicure, gold glitter ombre, and tortoiseshell all suit December events. Add a gold accent nail or swap the top coat for shimmer to refresh the look.
Are press-on nails good for Thanksgiving?
Press-on nails are a fast option if you lack time or art skills. Many brands sell fall designs like plaid and tortoiseshell. Use nail glue rather than adhesive tabs for longer wear through cooking and cleanup.